# 原理
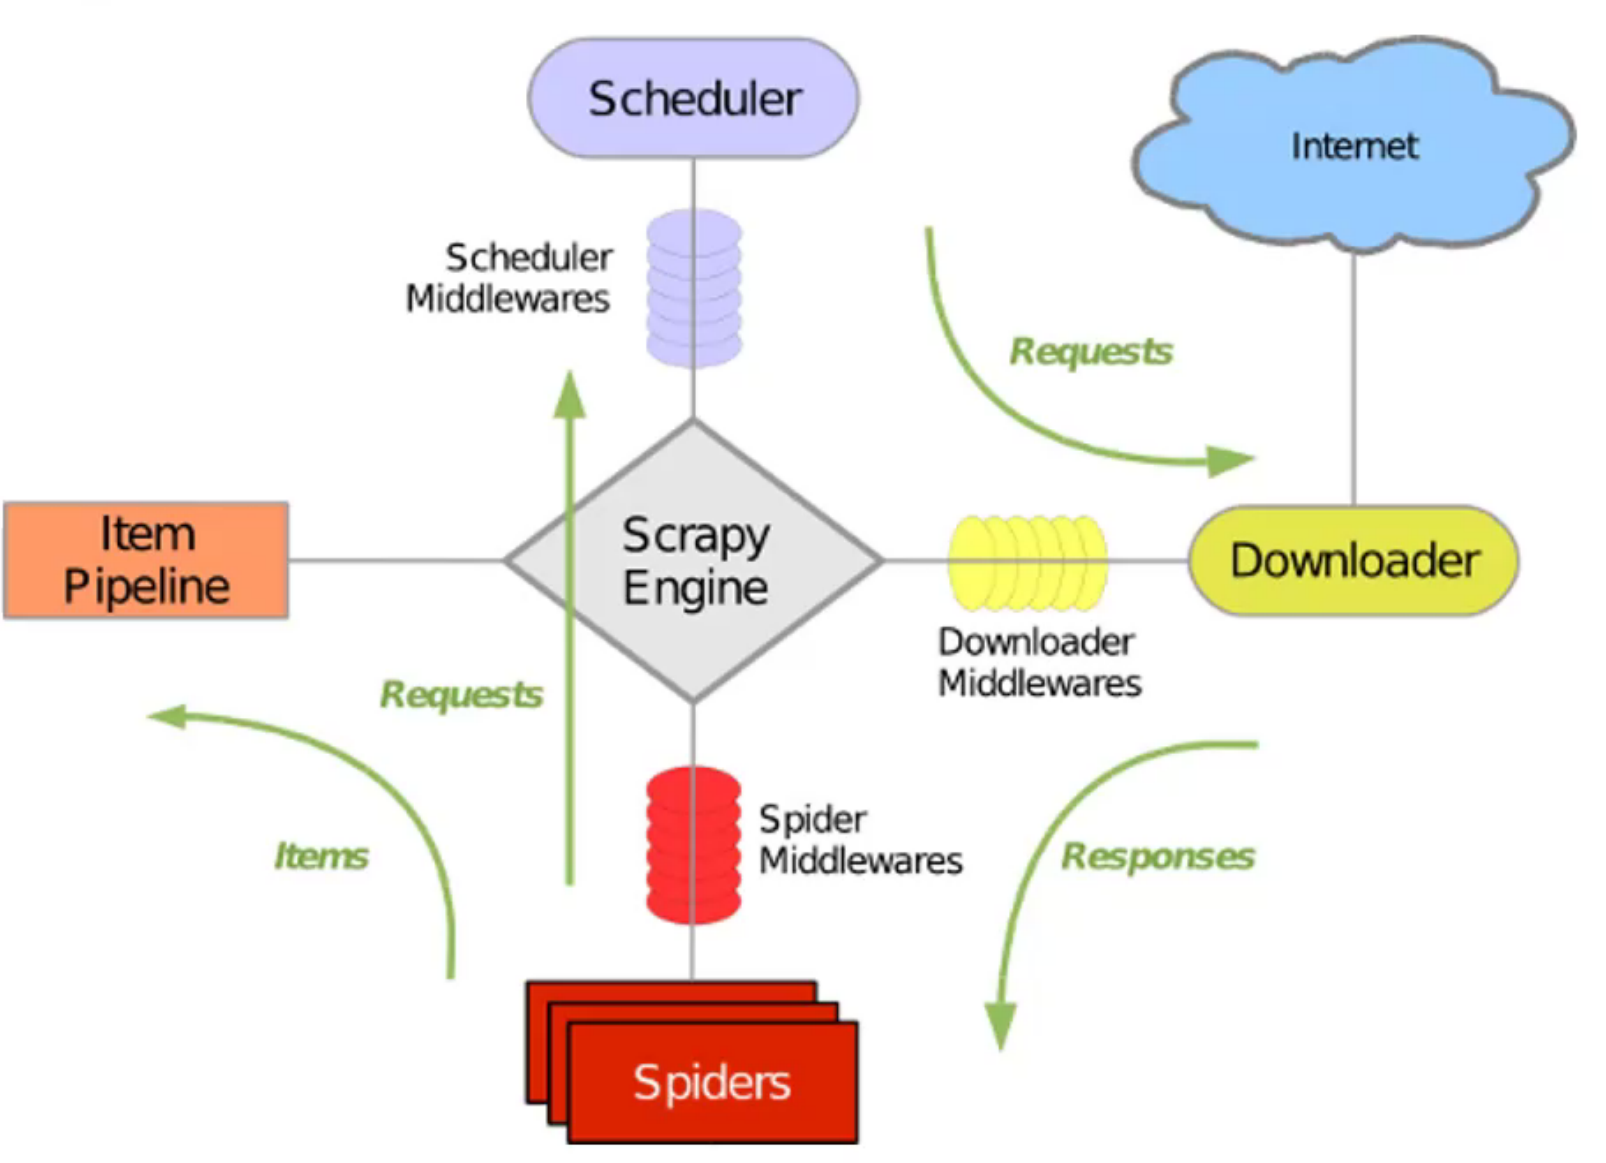
流程如下:
- 爬虫告诉引擎,需要爬取哪些链接
urls - 引擎把链接发给调度器
- 调度器收到链接后,进入队列
- 调度器从队列里取出链接,告诉下载器开始下载
- 下载完毕后,把结果交给爬虫
- 爬虫把结果中取回数据,交给管道
- 管道将数据存储到 MySQL/文本文件等
# 准备工作
安装 Python 3 后,
pip3 install scrapy
(可选)在本地安装 Redis 数据库,端口 5376,用户名 root,密码 123456;然后安装 Python 调用 Redis 的库:
pip3 install redis
# 简单爬虫
这里针对一个列表的网页爬取其列表内容,示例为 https://mobile.ithome.com/ 的新闻标题、链接等信息。
# 建立目录
第一步,建立项目。
scrapy startproject my_spider D:\ # 建立项目
会建立如下目录:
my_spider/
    scrapy.cfg
    my_spider/
        __init__.py
        items.py
        pipelines.py
        settings.py
        spiders/
            __init__.py
            ...
然后可以在 PyCharm 中打开 D:\my_spider。
其中,settings.py 中 ROBOTSTXT_OBEY = True 表示会自觉遵守页面规定,如果不让爬虫则不会进行爬虫。
# 生成爬虫代码
第二步,切换目录,然后生成一个爬虫:
cd /d D:\my_spider
scrapy genspider ithome mobile.ithome.com # 生成爬虫
此时 D:\my_spider\my_spider\spiders 下会自动生成 ithome.py,内容如下:
import scrapy

class IthomeSpider(scrapy.Spider):
    name = 'ithome'
    allowed_domains = ['mobile.ithome.com']
    start_urls = ['http://mobile.ithome.com/']

    def parse(self, response): # 解析 (parse) 网页的方法
        pass
这里可以将 start_urls 链接改为 https。
# 定义数据结构
第三步,定义数据结构。这里没有直接使用 Python 原生的继承于 object 的 class,而是选择继承 scrapy.Item 的类。这样定义的数据结构,更方便 Scrapy 处理。定义放在 D:\my_spider\my_spider\items.py。
import scrapy

class IthomeData(scrapy.Item):
    def __init__(self):
        title = scrapy.Field()
        time = scrapy.Field()
        abstract = scrapy.Field()
        url = scrapy.Field()
# 解析网站
第四步,定义数据结构后,开始解析爬虫获得的数据。爬虫本质获得的是 start_urls 对应的 html 文件, 然后解析 html,将解析到的数据进行处理。
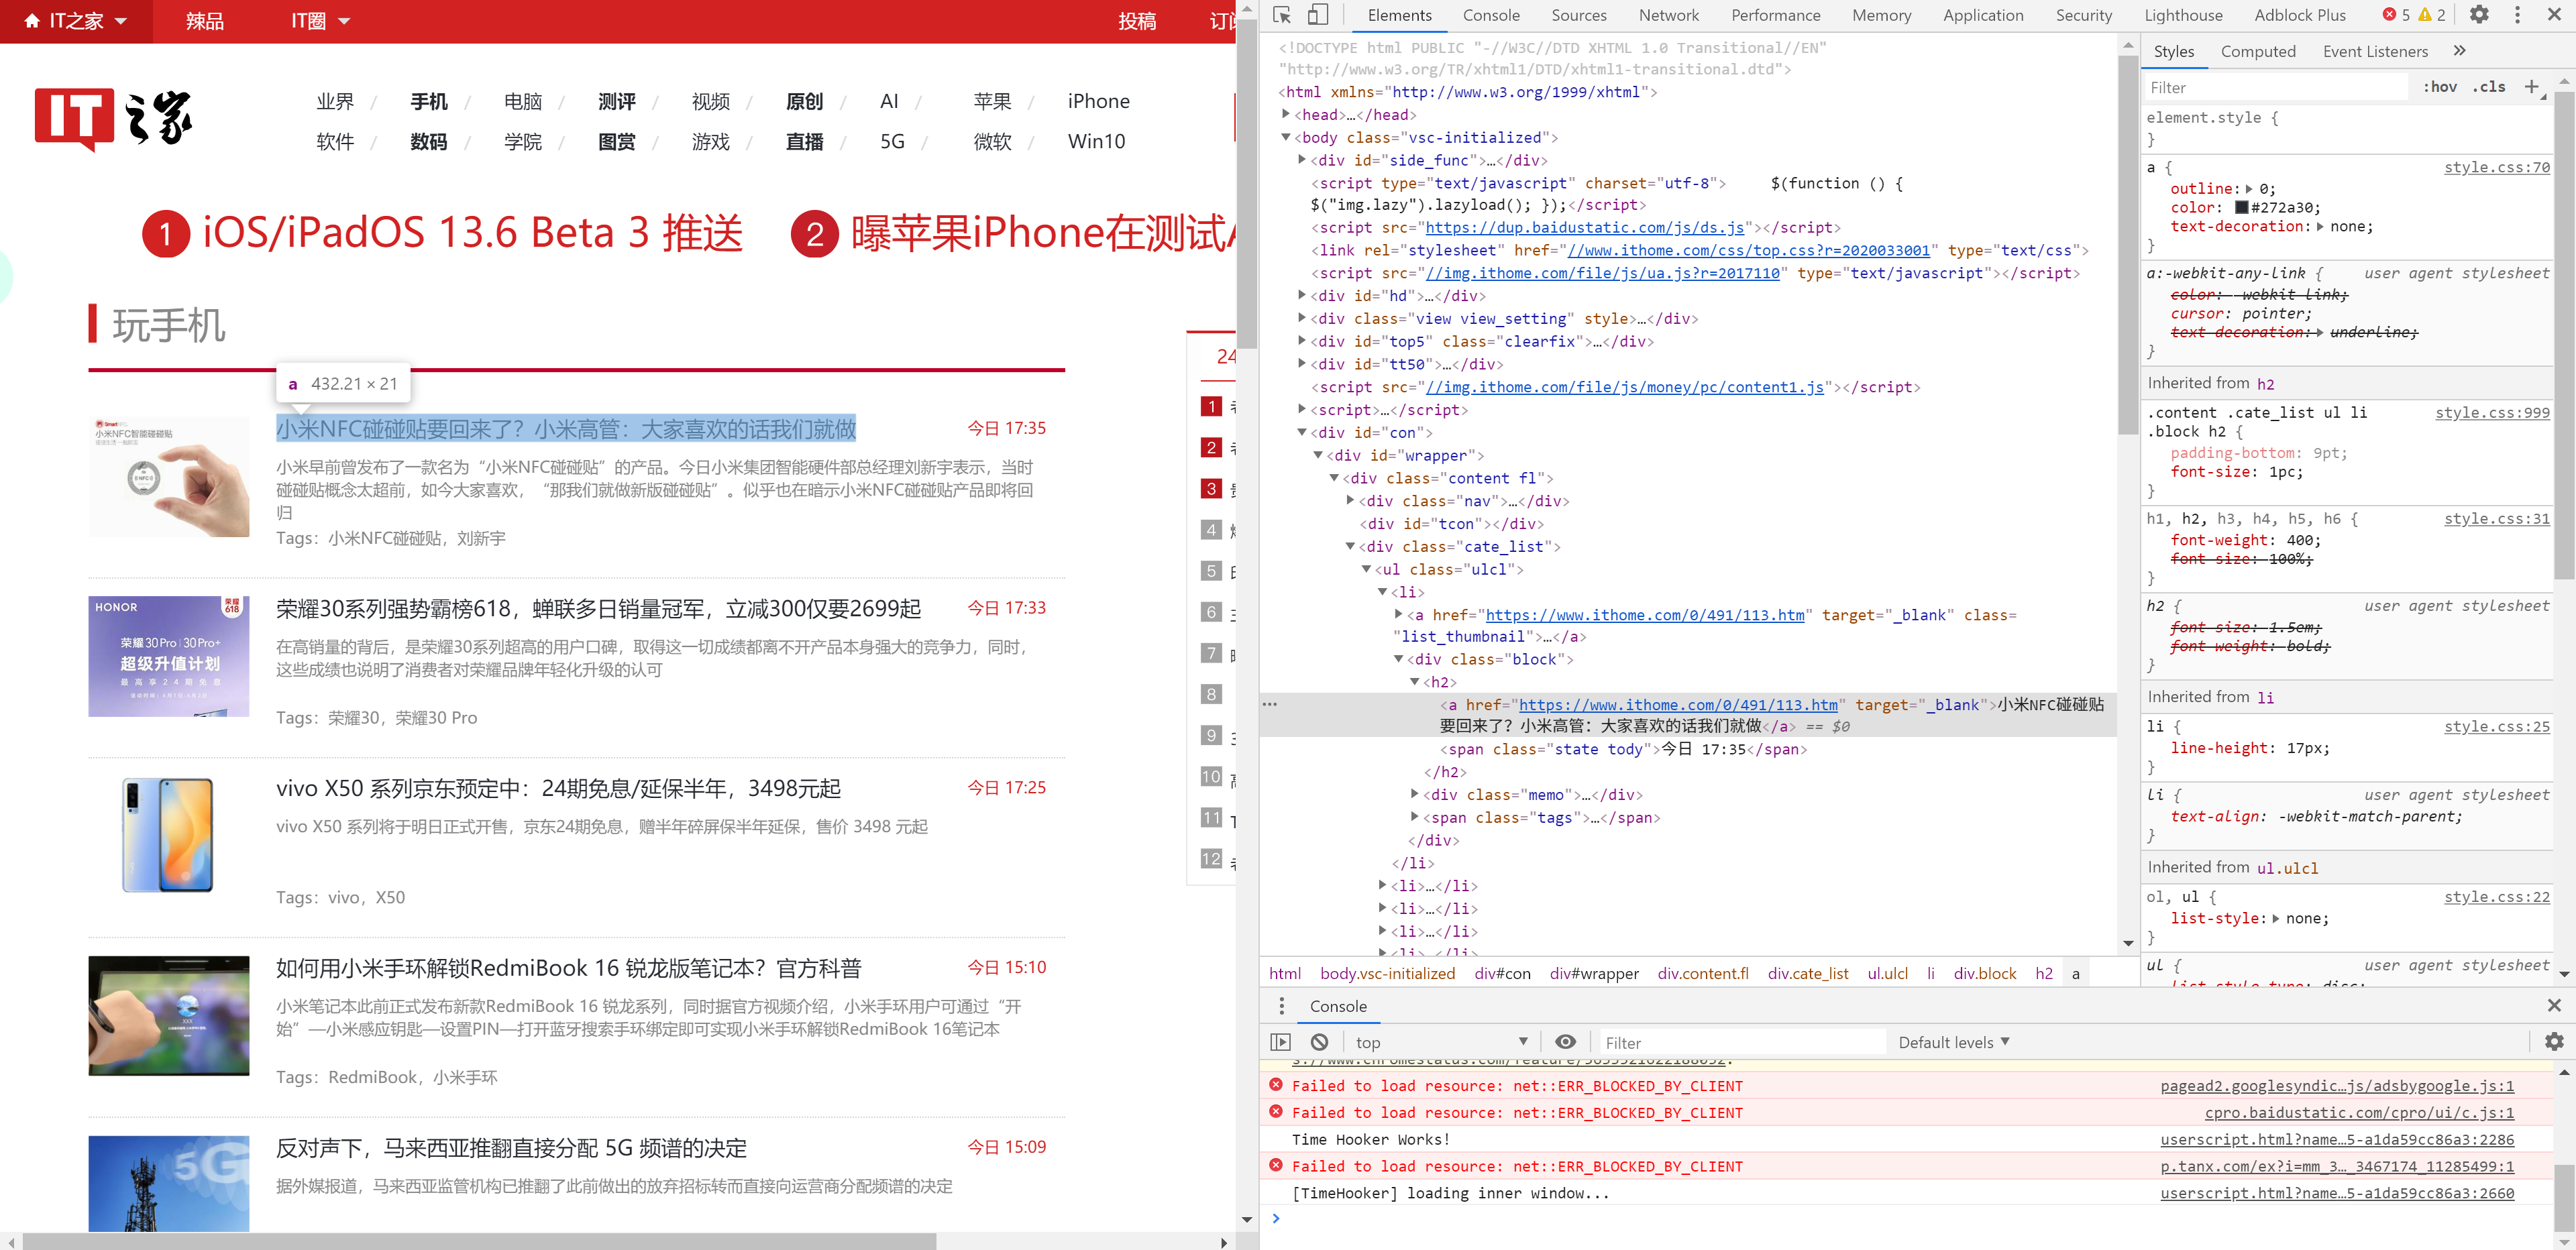
我们用 Chrome 打开 https://mobile.ithome.com/,右键一个标题并“检查”,可以看到该 HTML 的结构。
同时,在命令行执行 scrapy shell https://mobile.ithome.com/。看到以下输出:
2020-07-01 16:55:01 [scrapy.core.engine] DEBUG: Crawled (200) <GET https://mobile.ithome.com/> (referer: None)
2020-07-01 16:55:02 [asyncio] DEBUG: Using proactor: IocpProactor
[s] Available Scrapy objects:
[s]   scrapy     scrapy module (contains scrapy.Request, scrapy.Selector, etc)
[s]   crawler    <scrapy.crawler.Crawler object at 0x000001AEBC19F0A0>
[s]   item       {}
[s]   request    <GET https://mobile.ithome.com/>
[s]   response   <200 https://mobile.ithome.com/>
[s]   settings   <scrapy.settings.Settings object at 0x000001AEBC19BC70>
[s]   spider     <DefaultSpider 'default' at 0x1aebc4e6730>
[s] Useful shortcuts:
[s]   fetch(url[, redirect=True]) Fetch URL and update local objects (by default, redirects are followed)
[s]   fetch(req)                  Fetch a scrapy.Request and update local objects
[s]   shelp()           Shell help (print this help)
[s]   view(response)    View response in a browser
2020-07-01 16:55:02 [asyncio] DEBUG: Using proactor: IocpProactor
In [1]:
200 表示正常。输入 response 并回车:
In [1]: response
Out[1]: <200 https://mobile.ithome.com/>
接下来解析 response。解析的方法是使用 xpath。
XPath即为 XML 路径语言,它是一种用来确定 XML 文档中某部分位置的计算机语言。XPath 基于 XML 的树状结构,提供在数据结构树中找寻节点的能力。
在 Chrome 中右键想要爬取的第一个标题,然后 Copy Xpath,如下图:

然后作为 response 的 xpath 成员函数的参数,执行,结果如下,如果输出不是 [] 则正确。使用 extract_first 看到其内容。
In [12]: response.xpath('//*[@id="wrapper"]/div[1]/div[3]/ul[1]/li[1]/div/h2/a')
Out[12]: [<Selector xpath='//*[@id="wrapper"]/div[1]/div[3]/ul[1]/li[1]/div/h2/a' data='<a href="https://www.ithome.com/0/491...'>]

In [14]: response.xpath('//*[@id="wrapper"]/div[1]/div[3]/ul[1]/li[1]/div/h2/a').extract_first()
Out[14]: '<a href="https://www.ithome.com/0/491/113.htm" target="_blank">小米NFC碰碰贴要回来了?小米高管:大家喜欢的话我们就做</a>'
可以看到,标题已经出来了,并且和前面的图是一致的。
然后尝试找到遍历的方法。html 里,ul 是列表(unordered list),下面的每一个元素为 li(list item)。将上面的 Xpath 从 li 分开,因为我们需要在 Python 中遍历每个元素。注意在 Xpath 中下标从 1 开始,而在 Python 中下标从 0 开始。
In [16]: response.xpath('//*[@id="wrapper"]/div[1]/div[3]/ul[1]/li')[0].xpath('./div/h2/a').extract_first() # 注意第二个 Xpath 的开头有个 .
Out[16]: '<a href="https://www.ithome.com/0/491/113.htm" target="_blank">小米NFC碰碰贴要回来了?小米高管:大家喜欢的话我们就做</a>'
In [17]: response.xpath('//*[@id="wrapper"]/div[1]/div[3]/ul[1]/li')[1].xpath('./div/h2/a').extract_first() # 测试下一篇文章是否也是对应的
Out[17]: '<a href="https://www.ithome.com/0/491/111.htm" target="_blank">荣耀30系列强势霸榜618,蝉联多日销量冠军,立减300仅要2699起</a>'
再进一步获取其文本和链接,使用 text() 函数和 @href:
In [18]: response.xpath('//*[@id="wrapper"]/div[1]/div[3]/ul[1]/li')[0].xpath('./div/h2/a/text()').extract_first()
Out[18]: '小米NFC碰碰贴要回来了?小米高管:大家喜欢的话我们就做'
In [36]: response.xpath('//*[@id="wrapper"]/div[1]/div[3]/ul[1]/li')[0].xpath('./div/h2/a/@href').extract_first()
Out[36]: 'https://www.ithome.com/0/491/113.htm'
用同样的方法可以获取其时间、摘要:
In [41]: response.xpath('//*[@id="wrapper"]/div[1]/div[3]/ul[1]/li')[0].xpath('./div/div/p').extract_first()
Out[41]: '<p>小米早前曾发布了一款名为“小米NFC碰碰贴”的产品。今日小米集团智能硬件部总经理刘新宇表示,当时碰碰贴概念太超前,如今大家喜欢,“那我们就做新版碰碰贴”。似乎也在暗示小米NFC碰碰贴产品即将回归</p>'
In [48]: response.xpath('//*[@id="wrapper"]/div[1]/div[3]/ul[1]/li')[0].xpath('./div/h2/span/text()').extract_first()
Out[48]: '今日 17:35'
到这里就已经成功一半了。
# 编写解析函数
parse()是spider的一个方法。 被调用时,每个初始 URL 完成下载后生成的Response对象将会作为唯一的参数传递给该函数。 该方法负责解析返回的数据(response data),提取数据(生成item)以及生成需要进一步处理的 URL 的Request对象。
回到 D:\my_spider\my_spider\spiders\ithome.py,编写 parse 成员函数。parse 函数的思想就是,遍历 ul 的 li,取出我们需要的信息存进 item,然后返回 item。这里直接上代码。
# ithome.py

import scrapy
from my_spider.items import IthomeData

class IthomeSpider(scrapy.Spider):
    name = 'ithome'
    allowed_domains = ['mobile.ithome.com']
    start_urls = ['https://mobile.ithome.com/']

    def parse(self, response):
        li_list = response.xpath('//*[@id="wrapper"]/div[1]/div[3]/ul[1]/li')
        item_list = []
        for li in li_list:
            item = IthomeData()
            item["title"] = li.xpath('./div/h2/a/text()').extract_first()
            item["url"] = li.xpath('./div/h2/a/@href').extract_first()
            item["abstract"] = li.xpath('./div/div/p').extract_first()
            item["time"] = li.xpath('./div/h2/span/text()').extract_first()
            item_list.append(item)

        return item_list
注意,import 引入 item 的方式有点不一样,这里是 from my_spider.items import IthomeData。
# 编写管道
管道则是将上面 parse 函数的解析出来的 item_list 进行处理、存储。这里为简化代码,直接输出;当然也可以写入文本文件、存储到数据库等。代码如下:
# pipelines.py
class MySpiderPipeline:
    def process_item(self, item, spider):
        print(item)
# 运行爬虫
最后的最后,运行爬虫。可以直接在 D:\my_spider\my_spider 目录下运行 scrapy crawl ithome,也可以在该目录下编写以下 python 代码并运行。
from scrapy.cmdline import execute

execute('scrapy crawl ithome'.split(' '))
如果部分输出如下则正常(IT 之家貌似爬虫和直接访问得到的 HTML 不一样?可能做了防爬虫。至少方法是对的)。
{'abstract': '<p>今天小米10 Pro手机正式推送MIUI 12.0.1稳定版更新,并且不是稳定版内测,这意味着小米10 '
             'Pro手机普通用户也可以方便升级MIUI 12.0.1稳定版系统了。</p>',
 'time': '今日 23:09',
 'title': '小米 10 Pro 正式推送 MIUI 12 稳定版',
 'url': 'https://www.ithome.com/0/493/559.htm'}
2020-07-01 18:20:38 [scrapy.core.scraper] DEBUG: Scraped from <200 https://mobile.ithome.com/>
{'abstract': '<p>今日消息人士Jon_Prosser也曝光了代号为C68的苹果AirPower充电板原型机的真机照:此次曝光的AirPower充电板似乎解决了
过热问题,其已可满足AirPods '
             'Pro和一块Apple Watch同时充电</p>',
 'time': '今日 22:37',
 'title': '苹果AirPower充电板原型机曝光!Apple Watch/AirPods可一起充电',
 'url': 'https://www.ithome.com/0/493/555.htm'}